Tuesday 12 April 2016

Magazine UNIT 51: Plan for the Moodboard

 Our Assignment is split into three tasks.
- Mood board
- Collecting Photos
- Photo shoot.

My plan to include on the Moodboard

Online Pictures:

  • Taylor Swift
  • Selena Gomez
  • Grammy
  • Brit Awards
  • Album Covers
  • Microphone
  • Friendship
  • Heart
  • Red
  • Snow icicles
  • Designers
  • Friendship rings
  • Disney channel
  • Not another Cinderella story
  • red carpet
  • camera
  • the word commitment
  • the friendship goals
  • social media
  • Jonas brothers
  • top of the pops magazine
  • purple
  • white
  • gold
  • entertainment tonight logo
  • beanbag chairs
  • angels
  • Christmas
  • fans
  • barbie dolls of Taylor or Selena or any other celebrities/ barbie logo
  • Selena Gomez and Demi Lovato
  • Justin Bieber and ed Sheeren
  • Miley Cyrus and Ariana grande
  • Rhianna and Katy Perry
Original Pictures I want to Include as well as how i am planning the photoshoot
I want to include a shot with the 2 models caught in the moment while in a photo shoot that i will be administration

  • - they will be sitting on the floor with their legsfacing outwards next to each other so rher legs interlock
  • - they will be laughing about something funny tat may have happended and they will be showing smiles on their faces, their eyes shouldn't be on the camera so the picture doesn;t looked stage
  • i hope to put this in black and white
  • - i want another photo with both the models looking directly at each other with their hands balancing their faces and i want to amke it a close up as well, i want one model to be lloking directly at the camera whereas i want the other model to be looking at her smiling
  • - picture of two people holding hands
  • - picture of a piggy back with the two models
  • - a mock up of a red carpet shot with two of the models wearing designer dresses or in the cinema holding hands and crying with laughter
  • - a photo of the two models at the interview laughing with each other
  • - a fake snapchat of the two models together as in casully in a costa or a starbucks like an ordianry day out wearing casual clothes
  • - individual photo's of the girls wearing headshots looking professionaly done
Thursday 7 April 2016

Photography UNIT 57: Texture / Colour / Shape

Basic Enhancements to Photo


Texture
- Focus on the form for some interesting pictures
- Everything has a surface, everything has a texture
- some are course, some are fine, 
- feel texture with your hands
 - Don't photograph entire thing
- always get it in photo
- DO NOT USE FLASH

Colour 

- Balance and harmonies with the colours
- get a picture with loads of colours and change the contrast / saturation
- use the colour wheel to use contrasting colours

- Red, Blue and Green are the primary colours, they add energy and impact to the image
- Red is the strongest and can dominate a picture (even a tiny amount)
- shoot in strong, bright, light for best results

Shape
- helps frame a photo / useful composition aid
- make photography stronger
- van be real or made up
look beyond the obvious


Blog Task
Take 10 pictures and put onto my blog
Texture and Colour / Shape

Photoshop
- Contrast + Saturation

I am going to take the Photo's in school. This is my plan for taking the photos of texture, shape and colour.

I am planning to take the photos outside at a time where the weather is predicted sunny in the UK, by studying the weather in my local area, i plan to do the photography shoot next Monday.

I plan to go outside and take photos of leaves and flowers that have raindrops on them and specifically on the leaf rather than having fallen off.

I plan to also take photo's inside the school in a classroom that has big windows so that a lot of light can be let in such as the music room, i plan to use the shape effect with some of those instruments especially brass ones that have a hole at the end of them. i.e tuba, trumpet etc. i plan to take a photo of another object through the view of a brass instrument.

Finally,  I plan to take another set of photos in the school itself and i plan to use texture by taking pictures of food that i might have purchased in the cafe or the canteen. I especially would like to take pictures of the sandwiches of the canteen because of the bun and the fact that light shines off of it because it is so bare. I will use this as for texture as well as other foods such as lettuce which is beautiful when it washed.

Wednesday 6 April 2016

Photography UNIT 57: Aperture

Introduction to Aperture:

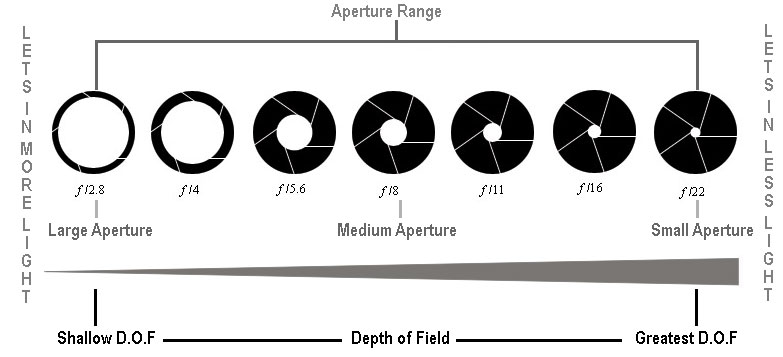
 - Size of the opening on the lense when a picture is taken
- Aperture impacts the size of the hole

Large the Hole - The more light that gets in
Smaller the Hole - The less light gets in

- hit the shutter
- hole opens
- allows light in
- capture the scene

Aperture = "an opening"
created by an adjustable iris opening and closing
- Iris is made of thin metal blades and move together to make a circular opening of a variable size
- Most DSLR , Iris is actually in the lense itself

Aperture is measured in f stops ( referred to as f number e.g. f/2.8, f/4, f/5 etc)

moving from one f stop to another to the next doubles or halves the size of the amount of the opening of the lenses
Large apertures (lots of lights gets through ARE GIVEN F/STOP smaller numbers and smaller apertures (where little light gets through) are given bigger numbers

Depth Of Field (DOF) is the amount of your shot will be in focus

- Large DOF means that most of your image will be in focus whether your camera is close or far away
- Small DOF means that only part of the image will be in focus and the rest will be blurry.
The larger the aperture the smaller the depth of field and Vice versa.

large aperture will decrease the depth of field whereas
small aperture will increase the larger depth of field

Small numbers mean small DOF - Large Numbers mean Large DOF

Landscapes require small aperture setting (large numbers)
Portraits require large aperture setting (small number)

Macro photographers tend to be bigger users of aperture to ensure that the element of their subject that they are focusing in on totally captures the attention of the viewer of their images while the rest of image is completely thrown out of focus

Large Apetures
- F2.8 to F5.6 produce a shallow depth of field
- the area of sharp focus would be small

- this can be useful when you want to isolate the subject of your picture while throwing the background and other elements out of focus

- useful applications of wide apertures include portraits and wildlife closeups.


Small apertures - F16 - F32
- increase the depth of filed which means more elements of a picture from foreground to background become sharply focused.

This can create a distinct sense of depth to a photograph, drawing viewer into the picture.


Tuesday 5 April 2016